Real estate drone video gives buyers the one view no interior camera can provide: the full lot, the surrounding street, and the neighborhood in one uninterrupted clip. Aerial footage adds location context that a 25-photo MLS grid misses entirely, and it runs in under two minutes of a listing tour.
This guide covers the FAA rules every agent must follow before flying commercially, the gear that delivers broadcast-quality aerials, a copy-paste six-shot sequence, and an editing workflow for fast turnaround. At the end, a no-drone path produces a photo-animated flythrough video from listing photos.
Why drone video wins real estate listings
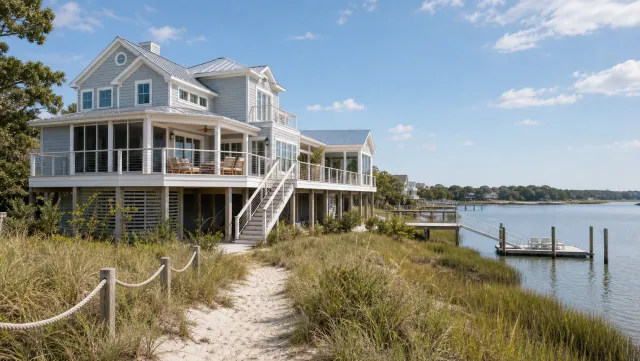
Drone footage communicates lot size, proximity to parks or water, neighborhood layout, and curb appeal in a single shot that buyers can play on their phone in seconds. That context shortens the gap between an online search and a booked showing.
Lot context is the biggest gap that aerials fill. A half-acre lot adjacent to a conservation area reads very differently from a half-acre lot adjacent to a commercial strip, and only an overhead view makes that clear in the first ten seconds. Buyers who see the neighborhood context before touring arrive with accurate expectations, which tightens the negotiation timeline.
Relocation buyers rely on aerial views to evaluate neighborhoods they have never visited in person. A slow orbit that pulls back to reveal the street, the school two blocks away, and the park behind the lot communicates what a static photo set cannot. These buyers are willing to move fast when the aerial matches the listing description, so the footage works as a qualifying filter before they fly in.
Drone clips also earn stronger organic reach on short-form social. A slow reveal of an exterior descending from 80 feet to eye level with the front door earns higher platform reach on Reels and TikTok than static photography, because the motion captures attention immediately and tends to hold watch time past the first two seconds, the threshold where most viewers decide whether to scroll away.
For the real estate video marketing strategy that distributes aerial clips across social, email, and listing pages, see the linked guide.
FAA Part 107 rules for real estate drone flights
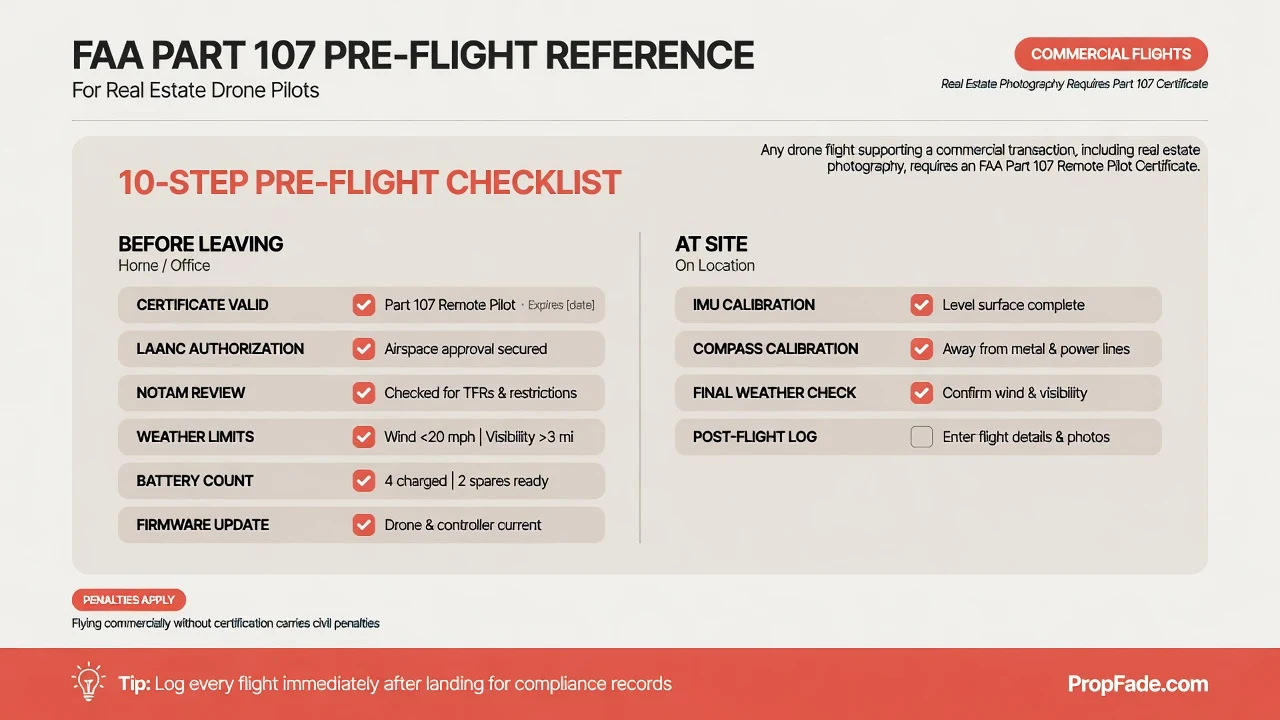
Any drone flight that supports a commercial transaction, including real estate photography, requires an FAA Part 107 Remote Pilot Certificate. Flying commercially without it carries civil penalties; verify the current figures and rules at faa.gov/uas before every shoot.
The Part 107 exam is a 60-question aeronautical knowledge test administered at an FAA-approved testing center. A passing score is 70 percent. The test covers airspace classifications, weather interpretation, drone performance, and FAA regulations. Most candidates study 10 to 20 hours using a dedicated prep course before sitting the exam, then receive the certificate within a few days of passing.
Airspace authorization is a separate step from certification and applies to every flight, not just the initial license. Class B, C, D, and surface E airspace near airports requires prior authorization for every individual flight. Same-day authorization is available through the FAA LAANC (Low Altitude Authorization and Notification Capability) system, accessible through apps such as Aloft or Hover. The FAA B4UFLY app maps restricted zones and temporary flight restrictions before you drive to the site.
Part 107 also sets daily operating limits: fly below 400 feet above ground level and keep the drone within your visual line of sight at all times. Night operations are permitted without a waiver as long as the pilot has completed the recurrent training course covering night operations and the drone carries anti-collision lighting compliant with Part 107 requirements. Waivers for operations that fall outside standard Part 107 limits are available through FAA DroneZone, with processing times that vary by request complexity.
The Part 107 Remote Pilot Certificate does not expire, but pilots must complete online recurrent training within the past 24 calendar months to remain current to fly. The recurrent course is offered through the FAA Safety Team (FAASTeam) online and replaces the former in-person exam requirement. Keep a digital copy of the certificate and your most recent training completion record on your phone to present on site if asked.
Gear and settings for aerial real estate video
The DJI Mini 4 Pro and the DJI Air 3 cover the vast majority of residential listing shoots. The DJI Mavic 3 Pro suits agents who shoot commercial or luxury properties and need a larger sensor with a longer optical zoom range.
The DJI Mini 4 Pro weighs under 249 grams, making it compact and easy to transport to listing shoots. For any commercial flight under Part 107, FAA drone registration is required regardless of weight; the 249-gram exemption applies only to recreational hobbyist operations, not commercial use. It shoots 4K at up to 60 frames per second, folds into a jacket pocket, and runs about 34 minutes per battery charge, which covers most residential exteriors in one battery with a spare on standby.
The DJI Air 3 steps up to a dual-camera system with a 1/1.3-inch primary sensor and omnidirectional obstacle avoidance, which reduces the risk of a collision near rooflines and trees. It is the better choice when a property has mature trees close to the structure or when you are shooting a tight infill lot in an urban neighborhood.
| Drone | Best fit | Article notes | Use case |
|---|---|---|---|
| DJI Mini 4 Pro | Most residential listing shoots | Under 249 grams, 4K up to 60 fps, folds into a jacket pocket, about 34 minutes per battery charge | Compact exterior and neighborhood shots with a spare battery on standby |
| DJI Air 3 | Tree-heavy or tight infill listings | Dual-camera system, 1/1.3-inch primary sensor, omnidirectional obstacle avoidance | Properties with mature trees, roofline hazards, or tight urban lots |
| DJI Mavic 3 Pro | Commercial or luxury properties | Larger sensor and longer optical zoom range than the residential defaults | Higher-end shoots where image quality and zoom flexibility matter |
For camera settings, shoot 4K at 30 fps and set shutter speed to roughly double the frame rate (1/60 second) for natural motion blur. Match the ND filter to the ambient light: ND16 handles bright midday sun, ND8 suits partly cloudy conditions, and ND4 works on overcast days. Use the drone’s flat or D-Log color profile if you plan a color grade in post; the standard profile is fine for agents who want to skip grading.
Fly in wind under 15 mph (check the specific model’s rated wind resistance before flying in gusty conditions). Early morning and golden hour deliver soft light on rooflines and warm greens on landscaping. Arrive 15 minutes early to run a compass calibration on flat ground away from metal objects and to confirm firmware is current.
Aerial drone shot list
- **Approach push:** fly toward the front door at 50 feet, descending slightly to eye level.
- **Clockwise orbit:** circle at 80 to 120 feet with the home centered.
- **Reveal descent:** move from orbit height to ground level as a transition.
- **Neighborhood pullback:** climb to 300 to 400 feet while the camera tilts downward.
- **Backyard wide:** hold 60 to 80 feet over the outdoor space.
- **Closing exterior:** finish with a static street-level shot for the outro.
The standard six-shot sequence for a listing shoot: (1) approach push toward the front door at 50 feet, descending slightly to eye level; (2) clockwise orbit at 80 to 120 feet with the home centered; (3) reveal descent from orbit height to ground level as a transition; (4) neighborhood pullback, climbing to 300 to 400 feet while the camera tilts downward; (5) backyard wide at 60 to 80 feet; (6) closing static exterior from street level for the outro. Capture each shot twice, a safe take and a better take.
For agents who combine aerial clips with interior footage into a single listing tour, the how to make a real estate video guide shows how to sequence the two into one polished edit.
Edit drone footage: pacing, music, color grade
Cut drone clips to 1.5 to 2 seconds each for a social short, and to 3 to 5 seconds each for a full listing tour embed. Short cuts that land on a music beat feel produced; long uncut aerials read as raw footage regardless of the image quality.
Color grade the aerial clips before mixing them with interior footage. Drone cameras, especially small-sensor models under 250 grams, tend to record cooler shadows and a bluer sky than a phone filming indoors. A warm grade, nudging white balance toward 5500K and adding light saturation to the greens, ties aerial and interior clips into one visual tone. One pass takes under five minutes in any free editing app.
Choose instrumental music at 100 to 120 BPM for a listing tour, where the pace reads as forward-moving without rushing. Open the edit with the approach push over the first five seconds, cut to the orbit on the first downbeat, and let the neighborhood pullback land on the music’s natural outro. That three-part structure gives the video a narrative arc with no voiceover required.
An ai real estate video editor handles beat-synced cuts automatically and exports all three aspect ratios in one pass. That feature alone saves the most time-consuming part of the drone editing workflow on high-volume weeks.
Export at 4K or 1080p in three cuts: 16:9 for YouTube and the listing page, 9:16 for Reels and TikTok, and 1:1 for the main feed. Keep the aerial approach and orbit in the opening of every cut, because the motion hook works across all three formats and gives the viewer a reason to watch through to the interior.
For a detailed walkthrough of timeline tools and export settings, the real estate video editing guide covers the full process including color-matching phone and drone footage.
Quick-start checklist for your first drone listing shoot
Run this list before every shoot. Each step takes under two minutes on its own; skipping any one of them can ground the drone, produce unusable footage, or create a regulatory exposure.
Before leaving for the site:
- Confirm Part 107 recurrent training is current (completed within the past 24 calendar months) and have certificate in hand
- Confirm drone FAA registration is current (3-year term) and registration number is affixed to the aircraft
- Confirm the drone broadcasts Remote ID (standard built-in broadcast or an attached broadcast module)
- Check airspace in B4UFLY and request LAANC authorization if the property sits in Class B, C, D, or E controlled airspace
- Review NOTAMs (Notices to Air Missions) for any temporary flight restrictions over the address
- Confirm weather: wind under 15 mph, visibility above three miles, no precipitation
- Charge all batteries and bring at least two spares; check total flight time needed against battery count
- Update drone firmware and controller app before you leave, not at the site
- Confirm the planned flight path avoids uninvolved people and moving vehicles unless the operation meets Part 107 category requirements
At the site:
- Confirm takeoff and landing permission from the property owner or their authorized representative
- Run IMU and compass calibration on flat ground away from large metal structures
- Set camera: 4K/30fps, correct ND filter for current light, flat or D-Log color profile
- Fly the six-shot sequence in order, capturing each shot twice (safe take, then better take)
- Check all six clips on the controller screen before you leave the site
- Log the flight: date, property address, flight duration, and battery cycles used
No drone? Create a flythrough video with PropFade
PropFade animates listing photos with parallax zoom and pull-back motion to produce a photo-animated flythrough video. This approach works from the photos in your set, so include exterior, street-view, yard, and neighborhood context shots for the strongest result. Upload 12 to 20 listing photos, confirm the property details, and export three formats in about two minutes.
This path fits listings where flying is impractical: properties inside Class B controlled airspace, last-minute listing adds where drone scheduling adds two or more days to the workflow, or portfolios where shooting every listing with a drone is not cost-effective. The output is a finished video in 9:16, 1:1, and 16:9 with voiceover and captions included.
No drone? Make a flythrough
Upload your photos and get a finished video back in about two minutes.
Agents who shoot drone video on select listings can use PropFade for the rest of the portfolio. Both inputs, aerial clips and photo-animated sequences, composite into the same per-format export, so every listing ships a video regardless of the shoot schedule.
5 listing photos
1 finished video
A complete real estate video program pairs drone aerials for premium and luxury listings with photo-generated videos for the rest of the portfolio. Every listing ships a video regardless of weather, schedule, or airspace restrictions.
Frequently asked questions
Yes. Any drone flight that supports a commercial transaction, including real estate photography, requires an FAA Part 107 Remote Pilot Certificate. The exam is a 60-question aeronautical knowledge test administered at an FAA-approved testing center, with a passing score of 70 percent. Verify current requirements at faa.gov/uas.
Part 107 rules require a Remote Pilot Certificate for all commercial flights, including real estate. Key operating limits: fly below 400 feet above ground level, stay in visual line of sight, obtain airspace authorization near airports through the FAA LAANC system before every flight, and ensure Remote ID compliance. Night operations are allowed after completing the recurrent training that covers night operations and equipping the drone with compliant anti-collision lighting. Current rules live at faa.gov/uas.
The DJI Mini 4 Pro (under 249 grams, 4K at up to 60fps) is the most practical choice for agents who shoot several listings a week because of its compact size and price. The DJI Air 3 adds a dual-camera system with optical telephoto, omnidirectional obstacle avoidance, and longer flight time for tighter lots and tree-lined streets. The DJI Mavic 3 Pro suits commercial and luxury shoots that need optical zoom and the largest sensor in the consumer lineup.
Professional drone photography services for real estate start around $150 to $300 per shoot for basic aerials, with full video projects running higher depending on the market, deliverables, and turnaround time. Check current rates with providers in your area, as pricing varies significantly by region. Agents who earn their Part 107 certificate and own a drone eliminate the per-shoot fee after the initial gear investment.